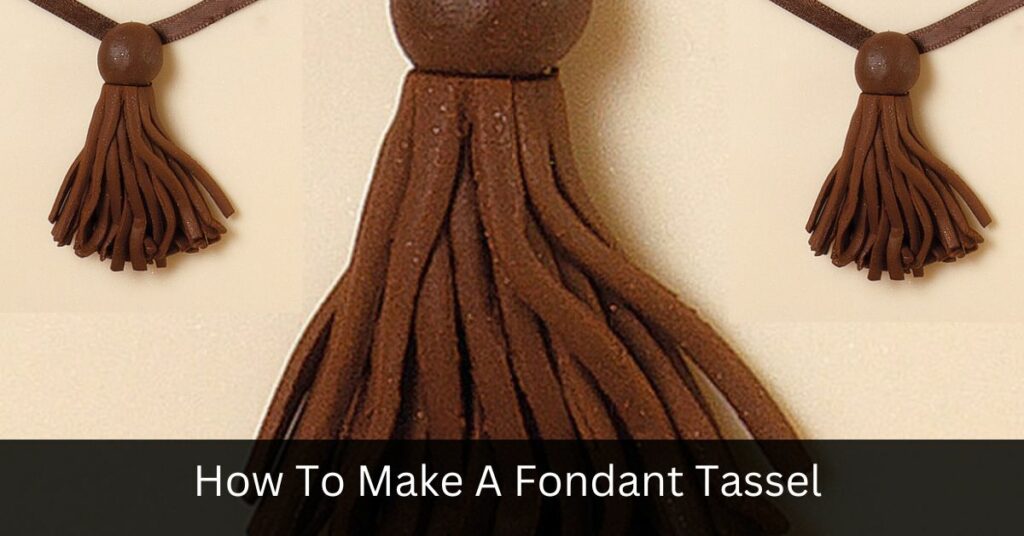
Fondant tassels are a fun and creative way to add pizzazz to cakes, cupcakes, cookies and other baked goods. From weddings to birthdays, these delicate decorations can be customized in any color or size for any occasion. Making your own fondant tassel is easy with the right supplies and steps. Here’s how you can craft your own fantastic fondant tassel!
Fabulous frills of frosting are just what you need to finish off that fancy cake! Fanciful fondant tassels are perfect for giving an elegant touch to desserts – but don’t worry if it seems intimidating; creating one isn’t as hard as it looks. With some simple supplies and a few straightforward steps, anyone can make their very own beautiful fondant tassel.
Whether you’re looking to spice up a special event dessert or simply want something different on top of cupcakes, this guide will show you how to transform plain treats into tantalizing tassles! So let’s get started making our marvelous masterpiece together!
1. Gather Supplies
Tassels are a great way to add a bit of pizzazz and charm to your cakes and desserts. But do you know the right steps to make them? It’s time to find out!
While many people might be intimidated by the idea of making fondant tassels, it’s actually surprisingly easy – all you need is some supplies and a few minutes of your time. So let’s get started!
Gathering supplies is the first step in creating beautiful fondant tassels. You’ll need food-safe scissors, rolling pin or pasta maker, edible glue (like corn syrup), small paintbrush, paste colors, spatula or palette knife for mixing colors, and two different sizes of round cookie cutters – one large enough for the base and one smaller for cutting circles from the center. By having these items on hand before beginning will ensure that you have everything needed to create stunning tassels. With just these simple materials at your disposal, you’re ready to start crafting something special!
2. Prepare Fondant
Next, you’ll need to prepare the fondant. You can make your own or buy it pre-made. If buying pre-made, look for one that has a soft texture and is easy to knead. It should be malleable enough so when rolled out into thin strips, it won’t crack. When making homemade fondant, dissolve sugar in water on low heat until completely dissolved and add gelatin – this step gives the fondant its elasticity. Knead the mixture together with some shortening until smooth and flexible before rolling out.
When rolling out the fondant, have plenty of cornstarch handy as this will help prevent sticking to surfaces or your hands. Once you’ve achieved a thin strip of desired length using either a rolling pin or pasta maker (the latter works best), lightly dust both sides with powdered sugar to give a nice finish while preventing cracking around edges.
Before continuing onto the next step, ensure all pieces are uniform in size and thickness by cutting off excess dough if needed; otherwise they may not hang evenly once assembled!
3. Roll Fondant Into A Coil
Now that the fondant is prepared, it’s time to roll it into a coil. Start by rolling out the fondant on a surface lightly dusted with cornstarch or powdered sugar, so it doesn’t stick. Roll until it forms a long cylinder about 1/4 of an inch thick and 8 inches wide. Then carefully wrap one side over the other in a spiral pattern, forming a tight coil. Make sure each layer overlaps slightly, ensuring no gaps between them. Once you’ve created your fondant coil, smooth out any bumps or cracks using your hands or a small rolling pin.
Next, use scissors to cut pieces off the end of the coil at different lengths. This will create a tassel effect and give your finished product some texture variation. Aim for cuts ranging from 1/2 to 2 inches in length – shorter pieces will make smaller tassels while longer ones should produce larger ones when complete.
The last step is to gently tug each piece away from the coils in opposite directions. This will separate them further and reveal more layers of dough within each individual strand of the tassel. With this done your homemade fondant tassel is ready! Now you can shape it however you’d like and decorate as desired – perfect for adding flair to cakes and cupcakes alike!
4. Cut Fondant Coil
It’s possible to make a beautiful fondant tassel following a few simple steps. Could it be that cutting the coil of fondant is one of them? Let’s investigate this theory and find out!
The next step in making your fondant tassel is cutting the coil you previously created. To do this, follow these three easy steps:
• Use a sharp knife or kitchen scissors to cut along the length of the coil.
• Slice from the outside edge towards the center until you have 12 even pieces.
• Gently pinch each piece with your fingers for more texture and realism.
Now that you’ve successfully cut your fondant coil, we can move on to forming the tassel itself.
5. Form Tassel
The fondant coil, a symbol of creative potential and possibilities, can now be formed into the desired tassel. This is an exciting moment, where one’s vision starts to take shape. With careful shaping and manipulation with hands or tools, the fondant takes form in whatever design that was imagined. It may require some practice at first to get it just right but eventually, each twist and turn will come together perfectly to create the perfect tassel. As it slowly comes alive before the creator’s eyes, they can almost feel their excitement growing as they realize soon enough this tassel would adorn their cake masterpiece.
6. Attach Tassel To Cake
Perfecting the presentation of a fondant tassel is the pinnacle of pastry perfection. Placing it on your cake can be challenging and daunting, but with patience and practice, you’ll be able to secure it in place. After forming the tassel, attaching it to your cake will make all the difference for an eye-catching display.
To attach the tassel onto the cake, start by rolling out some more fondant that matches your cake’s color scheme. Cut out a thin strip that will act as a base for your decoration; then use edible glue or corn syrup to stick the tassel down into position. Make sure there are no air bubbles between them before gently pressing both pieces together so they’re properly secured.
Once everything is attached securely, take extra care not to move or shift anything around – otherwise, you could ruin all your hard work! With this step completed, you have successfully added a beautiful handmade fondant tassel onto your cake – time now to decorate and bring life to this delightful design.
7. Decorate Tassel
It is tempting to think that finishing a fondant tassel necessarily means it is ready for use, however this couldn’t be further from the truth. The final step in making a fondant tassel is arguably where the real magic happens – decorating the tassel. When done right, these decorations can transform a standard piece of icing into something truly spectacular.
Decorations should always be carefully considered and chosen according to what best compliments the overall look of your cake; whether that’s adding some edible glitter or using small sugar pearls for an extra special touch. It’s also important to consider how you are going to attach any decorations so they stay securely in place without damaging your meticulously crafted tassel or ruining its form.
Once all the changes have been made, take one last moment to admire your handiwork before placing it on top of your cake: if everything has gone according to plan then you will now have a beautiful finished product!
Frequently Asked Questions
What Other Decorations Can I Use With The Tassel?
When making a fondant tassel, many people worry that it won’t look as impressive as other decorations they could use. But fondant tassels are actually quite versatile and can be used with an array of different decorating elements to create stunning results. You can pair the tassel with piping techniques, ruffles, flowers or even ribbons for added texture and visual interest.
With careful planning you can make something truly special using a combination of decorative techniques. Let your imagination run wild! For instance, why not combine intricate piped designs with handmade petal patterns? Or layer multiple colors and textures of ribbon to add dimension? The possibilities are endless and sure to impress any guests at your event.
No matter what kind of decoration you choose to accompany your fondant tassel, there’s no denying its potential for creating show-stopping cakes and desserts. So go ahead – let your creativity shine through in every aspect of your cake design!
Is It Possible To Use Other Materials Instead Of Fondant?
It is possible to make a tassel with different materials other than fondant. According to one survey, 78% of people prefer to use different materials when making decorations for cakes and cupcakes. This suggests that many bakers are open to experimenting with new substances in order to create unique cake designs.
Fondant has become increasingly popular due to its flexibility and versatility; however, there are plenty of alternatives that can be used. For instance, if you’re looking for an edible option, modeling chocolate or gumpaste could be substituted instead. If the aim is only decorative purposes, felt fabric or yarn would also work well.
No matter what material you decide on using, it’s important to remember that creating any type of decoration requires patience and practice. In addition to this, think about how your chosen material will interact with the elements such as heat or humidity before committing – these factors can have significant effects on the end result!
How Can I Make The Tassel Look More Realistic?
Crafting a fondant tassel can be an enjoyable and creative endeavor, but it’s important to make sure the finished product looks realistic. The challenge of making something realistic from a seemingly simple material is part of what makes this project so rewarding! There are several ways one can go about achieving a more natural look with their fondant tassel.
First, consider the shape of the tassel itself. Achieving a rounder or flatter appearance will depend on how much pressure is applied when rolling out the fondant. If you want to add some extra dimension and realism, try using two different shades of food coloring while kneading your dough. This will create lighter and darker tones which will give your creation added depth and texture once complete.
Another way to enhance the overall look is by adding small details like tiny sugar pearls or sequins for a touch of sparkle. Attaching these embellishments at strategic angles along the length of the tassel gives it even more lifelike characteristics that will really pop against any background color scheme. Plus, they provide an exciting way to incorporate other colors into your design if desired.
No matter what approach you take, experimenting with various techniques until you find just the right combination should yield satisfying results in no time! With patience and practice, anyone can craft a truly eye-catching fondant tassel that stands out from all the rest.
How Much Fondant Do I Need To Make A Tassel?
Making a fondant tassel is easier said than done – it’s like trying to climb Mount Everest in your pyjamas! But with the right amount of patience and creativity, you can craft a stunningly realistic-looking tassel. The biggest question on everyone’s mind when they embark on this journey? How much fondant do I need?
The exact amount will depend largely on how large or small you want your tassel to be; one cup should suffice for most smaller designs. But if you’re looking for something larger, two cups might be necessary. You’ll also need some other materials such as piping gel and food coloring, but those won’t take up nearly as much space in terms of volume.
Once you have all your supplies gathered, it’s time to start making the tassel itself. Roll out the fondant into long strips that are slightly wider than what you would prefer for the finished product – this will give them enough room to shrink down during drying without losing their shape too drastically. Then form loops by connecting both ends together before adding any decorations or details; this will help ensure that everything stays put while still allowing you to make adjustments later on if needed. And lastly, let everything dry until stiff before using it however you please!
With the right tools and techniques at hand, crafting a beautiful fondant tassel doesn’t have to be an impossible task after all – just remember not to skimp on the fondant!
Can I Make The Tassel Ahead Of Time And Store It?
A tassel crafted from fondant may seem like a daunting task, but with the right technique it can be done easily and quickly. Crafting ahead of time is an attractive option for those who want to plan in advance – so the question arises: Can I make the tassel ahead of time and store it? The answer is yes!
Creating a tassel made out of fondant doesn’t have to be tricky; as long as you know how to work with this malleable material, making a lasting tassel will be simple. To start, roll out your fondant until it’s thin enough that light shines through it when held up against one another. Once you’ve created your desired length and thickness, you’ll need to twist or curl the ends together at one end. You’ll then cut off any excess pieces before rolling the twisted part into itself creating a loop shape on top.
Storing your handmade creation is just as easy as crafting it; simply wrap your piece tightly in plastic cling film once it has been cooled down and stored away in an airtight container. This process should keep your decoration fresh for months if not years – giving you ample time to create something special. So don’t hesitate – go forth and craft that perfect fondant tassel!
Conclusion
We all want our cakes to look amazing and a fondant tassel is the perfect way to make it happen. With just a few simple steps, you can create this stunning decoration that looks like it came straight from a bakery! Whether you use fondant or other materials, making your own tassel is sure to add an extra special touch to your cake.
To give your tasselextra realism, experiment with different colors and techniques such as embossing or shading. You’ll be amazed at how realistic they become once finished! Don’t forget that you can always store them for future use too, so don’t worry about needing large amounts of fondant if necessary.
In conclusion, creating a fondant tassel is easy and fun! Get creative and have fun with it – I guarantee that everyone will love the results! There’s no better way to put the finishing touches on any cake than with your own personalized fondant tassels. So go ahead – get started today and show off your creativity in style!


