Have you ever looked in the mirror and asked yourself why your freshly glazed cake isn’t as shiny as you expected it to be? It can be disappointing, especially if you’ve put hours of effort into creating a beautiful masterpiece. But don’t worry – we’re here to help! In this article, we’ll explore all the possible reasons why your mirror glaze isn’t so glossy after all. So come with us on a journey through the different components of a successful glazing process, from sugar content to temperature control; let’s get that shine back in no time!
1. What Is Mirror Glaze?
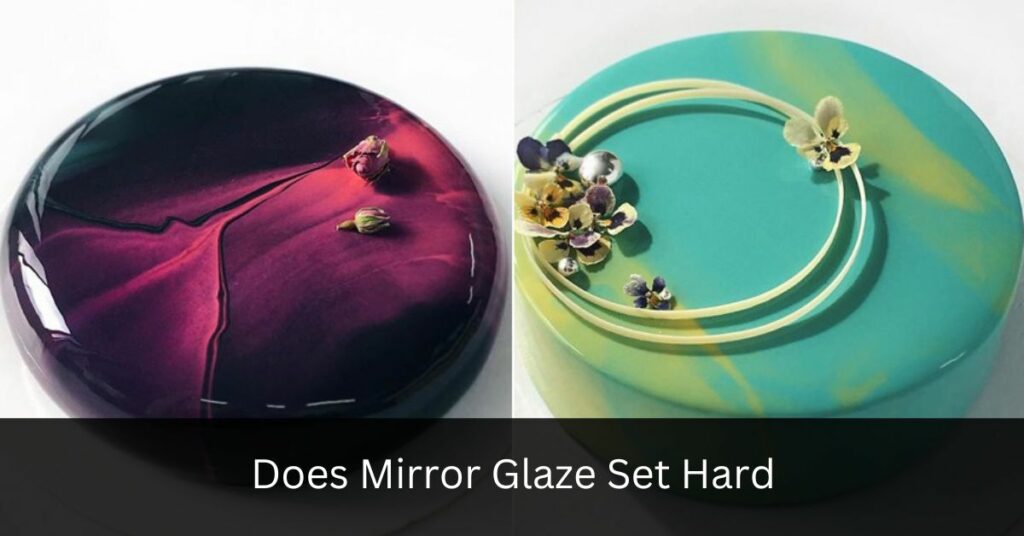
Mirror glaze is a type of icing or cake frosting that creates a smooth, glossy surface. It’s often used to decorate cakes and can be made with chocolate ganache, white chocolate, gelatin, and sugar syrup. The final result should be a shiny mirror-like coating on the cake.
However, if your mirror glaze isn’t coming out as expected – it may not have the desired shine – it could be for several reasons. Many times, this has to do with understanding the ingredients you’re using and how they interact together when making the glaze. Understanding these elements will help ensure that you get that perfect mirror finish every time.
To start getting more consistent results from your mirror glaze, take some time to learn about each ingredient involved in the process. Knowing what types of texture and consistency each component brings is key to achieving those beautiful reflective results you want!
2. Understanding The Ingredients
Making the most delicious desserts requires a certain finesse and attention to detail, one of which is mirror glaze. This tantalizing topping adds an extra layer of flavor and texture on top of your favorite treats.
However, it’s not always easy getting the perfect shine and sheen that you expect from this type of icing. Understanding what goes into creating a glossy finish can help you get closer to achieving the impressive results you desire.
Let’s take a look at some of the key ingredients for making mirror glaze: gelatin, condensed milk, white chocolate, glucose syrup, water and food coloring. Gelatin provides structure while condensed milk gives it richness; white chocolate adds sweetness and body; glucose syrup imparts glossiness; water helps thin out the mixture; food coloring adds color and vibrancy. By using these components in combination with each other, you can successfully create a mirrored effect on top of your masterpiece!
3. Preparing The Glaze
Preparing the glaze is like assembling a puzzle. It requires attention to detail and precision in order to get it right. There are several steps that must be followed before you can even start thinking about applying the glaze to your mirror:
1) Measure out all ingredients with exact measurements, as this will affect the final outcome of your glaze.
2) Make sure that all ingredients are at room temperature before mixing them together – cold temperatures may make the mixture not mix properly.
3) Be sure to blend everything thoroughly until there aren’t any lumps or bumps left in the mixture.
Once these steps have been completed correctly, you’ll be ready for the next step in creating a beautiful, shiny mirror glaze. Each one of these points plays an important role in ensuring that your glaze turns out how you want it to when applied – if done wrong, no amount of application technique can fix it! With this knowledge under your belt, you’re now ready to move on and apply the glaze so that you can admire your finished project’s glossy surface.
4. Applying The Glaze
Applying the glaze can be a tricky process. It’s important to use an even, consistent coating of the glaze in order for it to achieve maximum shine when done. Make sure you have all your tools ready – spatula, bowl and mirror surface – before beginning. Start by taking some of the glaze from the bowl with a spatula and spreading it on the mirrored surface in an even layer. Be careful not to leave any lumps or patches as these could affect how shiny your finished product is.
Once you’re happy that everything is evenly spread out, take a clean cloth and gently wipe off any excess glaze from around the edges of the mirror frame. This will make sure that no extra bits are left behind once it has dried up. Now wait until the glaze has completely set before moving onto further steps like buffing or polishing.
The key here is patience; if you rush this step, chances are your end result won’t give you that perfect glossy finish you were looking for! By following these simple tips and tricks, you’ll be able to create a stunningly shiny mirror glaze every time.
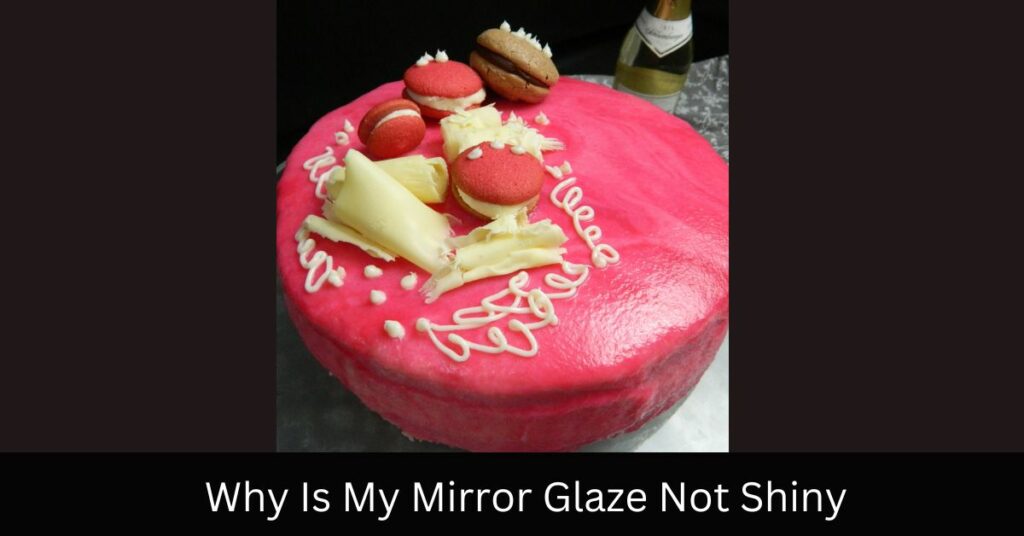
5. Reasons For Dull Mirror Glaze
When it comes to mirror glazing, the result you’re aiming for is an ultra-smooth and shiny finish that looks like a reflection in a mirror. Unfortunately, sometimes this goal isn’t achieved – leaving us with dull or streaky results. Let me tell you about my own experience: I once used a chocolate mousse recipe that called for a ‘mirror’ glaze on top of the dessert. After following all the steps precisely, I ended up with some sections of matte glaze and other parts still looking quite rough. It was incredibly disheartening!
So why does this happen? There are several common causes for dull or streaky mirror glazes. For instance, not using enough heat when making your mixture can lead to streaks throughout the finished product. Not refrigerating the cake prior to pouring on the glaze could also be responsible; if there’s too much warmth from the cake itself, it will cause bubbling and imperfections as soon as you pour on your mixture. Additionally, overmixing your ingredients can create air bubbles that prevent a perfectly even and glossy surface from forming in the end.
The good news is that these issues can often be avoided by properly preparing ahead of time and being mindful while mixing together your ingredients. Taking extra care during each step will help ensure that your final masterpiece turns out just right!
6. Troubleshooting Tips
Have you ever wondered what could be preventing your mirror glaze from looking shiny? You may have tried every technique, but still nothing seems to work. The good news is that there are certain troubleshooting tips you can use to identify why your mirror glaze isn’t shining. Let’s take a look at them now:
• Check the consistency of the glazing medium – it should neither be too thick nor too thin.
• Ensure all ingredients are thoroughly mixed together; any lumps or clogs in the mixture will prevent reflection and shine.
• Make sure to use enough heat when baking; this helps activate crucial ingredients for achieving a glossy finish.
With these simple steps, you’ll be able to get closer to finding out what’s causing your dullness issue. After checking off each tip on our list, you’ll finally discover how best to make your mirror glaze come alive! Now let’s move onto ways we can achieve a shiny mirror glaze…
7. Ways To Achieve A Shiny Mirror Glaze
The prospect of achieving a glossy, mirror-like glaze can seem like a distant dream. Its reflective beauty and high shine is captivating to the eye – but how do you get there? Don’t worry! Here are seven ways to achieve that perfect finish.
Imagine it: your cake covered in an immaculate glaze with incredible glossiness. The reflection from its surface is almost hypnotic. Now let’s make this image a reality by following these steps below.
Firstly, prepare the environment for success. Make sure you have enough counter space to work on and that your area is free from any disturbances or air drafts which could affect the outcome of your mixture. Secondly, use quality ingredients such as chocolates and other sweeteners that contain cocoa butter; this helps create a smoother texture when combined together. Thirdly, be precise with measurements when creating the glaze mix – too much liquid will result in not enough set time for the final product while too little may cause cracking or prevent proper setting altogether. Fourthly, gently heat up the mixture until all ingredients are well blended without over-heating otherwise small oil pockets might form on top of the glaze and reduce its overall shininess. Finally, ensure even coverage when applying onto cakes by using either a spoon or spatula depending on preference – avoid brushing as this could disrupt consistency across surfaces leading to uneven results afterwards.
Gone are those days of unattractive matte finishes – now you can confidently add beautiful sheen to each one of your creations! By following these tips above, you’ll soon be able to turn heads with every single bake you produce!
Frequently Asked Questions
What Other Ingredients Can Be Used To Make A Mirror Glaze?
Creating a mirror glaze is like standing in front of a dark abyss, with the promise of an illuminated reflection waiting just beyond. It can be daunting to try and achieve that perfect glossy finish but there are alternative ingredients you can use to explore new possibilities.
Fruit purees such as raspberry or mango can make for a delicious topping on cakes and desserts. These have a syrupy consistency which creates a thin layer when poured over warm cakes. They also contain natural pectin which helps the glaze set quickly and form an even sheen once cooled. Adding some sugar syrup will help intensify the flavour and create a stronger shine without having to overcook it.
Creams, custards, jams, jellies, chocolate ganache – these all provide different ways to give your cake that stunningly smooth texture while adding unique taste combinations. You could combine them with other flavours such as zests or extracts to add complexity and depth. Experimenting with different textures and ratios until you find what works best for you is key to creating a beautiful mirror glaze – one that shines bright enough for anyone’s reflection!
Can The Glaze Be Made In Advance?
Making a mirror glaze is like walking on eggshells; you have to be careful with all the ingredients, else it won’t turn out shiny. But once everything has been carefully prepared and blended, one might wonder if they can make the glaze in advance.
The good news is that yes, making a mirror glaze ahead of time is possible. All you need to do is leave the mixture overnight in an airtight container so that it doesn’t dry up or spoil. When ready to use, just add some additional liquid and mix gently until smooth before applying onto your desired surface.
However, there are certain conditions that must be met for this method to work effectively; any changes in temperature or humidity could affect how well the glaze sets and shines after setting. Therefore, it’s important to store the mixture in a cool place away from direct sunlight or heat sources as much as possible.
Overall, being able to prepare the mirror glaze beforehand can definitely help save time when putting together desserts or other dishes requiring a glossy finish. The key thing here though is ensuring proper storage conditions for best results – don’t let those hard-earned efforts go down the drain!
How Long Does The Glaze Need To Set Before It Can Be Used?
Mirror glaze is a delicious, glossy dessert topping that can take any dish to the next level. But how long does it need to set before you can enjoy its silky smooth texture? The answer may surprise you!
Using rhetorical devices like repetition, we can state emphatically: mirror glaze needs time. Time for all of its components – sugar, cream, chocolate and more – to meld together into something magical. Without this crucial step in the process, your mirror glaze won’t be as shiny or luscious as it could be.
So if you want your desserts to dazzle with a glossy finish, give yourself enough time to let the glaze properly set before serving. In no time at all, you’ll have an irresistible treat that’s sure to make your guests smile!
Are There Any Special Tools Needed For Applying The Glaze?
Have you ever wondered what special tools are needed to apply a mirror glaze? Applying a mirror glaze can be tricky, but with the right equipment it’s easy. Here are some essential items that will help make your application process easier and create a perfect shine:
• A pastry brush or silicone spatula for spreading the glaze evenly over the cake
• Heat gun or blow dryer to warm up the glaze which helps achieve an even layer of coverage
• Rubber gloves to protect hands from heat during use of the heat gun/blow dryer
• High-quality kitchen scale for precise measurements when mixing ingredients together
• Non-scratch bowl and spoon for mixing ingredients without damaging delicate surfaces
Using these supplies correctly will ensure that you get excellent results every time. Whether you’re looking for a glossy finish or want something more subtle, these items can help you achieve whatever look you desire. The best part about applying a mirror glaze is how creative you can be – experiment with different techniques until you find one that works perfectly!
Is There A Difference Between A Shiny And Non-Shiny Mirror Glaze?
The difference between a shiny and non-shiny mirror glaze can be confusing to discern. It’s important to note that the main factor that determines whether your mirror glaze will be shiny or not is simply what ingredients you use when creating it. Shiny results usually come from using more sugar, while non-shiny results are typically due to lower amounts of sugar in the recipe.
What other factors might have an impact on the resulting shininess? Temperature plays a part as well; higher temperatures may produce shiner results than lower ones since they allow for better dissolving and mixing of ingredients. Additionally, different types of sugars and fats can also alter the outcome: some combinations result in a less glossy finish compared with others.
It’s worth experimenting with various recipes until you find one which produces the desired level of shine – this could involve adjusting both temperature and ingredient measurements until you get exactly what you want! Plus, if all else fails, then there are always specialized glazes available commercially which provide guaranteed glossy finishes every time.
Conclusion
The mirror glaze is a tricky beast to master, but with practice and patience it can be achieved. The key to success lies in understanding the factors that affect its shine – from knowing what other ingredients are necessary for the perfect recipe to when best to apply it. When you get these things right, your glaze will have a beautiful glossy sheen like the sun’s reflection on still water.
It takes time and care to create something truly special; there’s no shortcut or quick fix if you want results that last. I believe this is true of most endeavours – nothing worthwhile comes easy! It may take several attempts before you achieve perfection, but every effort brings you closer to your goal. And once you’ve found the sweet spot between all aspects of the process, your reward will be a lusciously shiny mirror glaze that dazzles even the harshest critic.
So don’t give up! Put in the hard work and pay attention to detail and soon enough you’ll see your efforts reflected back at you in shimmering glory.